How to Block a Program from Accessing the Internet in Windows 11

Do you want to prevent a particular application from connecting to the internet on Windows 11? You can do this without installing any additional firewall software.
Windows 11 includes a built-in security feature called Microsoft Defender Firewall, which allows users to control network traffic and create rules for individual applications.
Blocking internet access for a specific program can be useful in various situations. For example, you may want to stop an application from connecting to online services, prevent unwanted background connections, reduce unnecessary network activity, or have more control over which programs can communicate with the internet.
In this tutorial, we will show you how to block a program through Windows 11 Firewall using the built-in firewall management tools.
The method is relatively straightforward and can be performed even if you have little experience with Windows network settings.
Why Block a Program from Accessing the Internet?
There are several reasons why Windows users may want to restrict an application’s internet connection.
Some common reasons include:
- Preventing an application from connecting to the internet
- Stopping unwanted background network activity
- Reducing unnecessary bandwidth consumption
- Preventing certain applications from downloading updates automatically
- Controlling applications that are allowed to communicate online
- Adding an extra layer of control over network traffic
Windows 11 provides the necessary firewall tools to create these restrictions without requiring third-party software.
How to Block a Program Using Windows 11 Firewall
The easiest way to block a desktop application is to create an outbound firewall rule for its executable file (.exe).
An outbound rule determines whether a program installed on your computer is allowed to establish connections to other computers or services over a network.
Follow the steps below.
Step 1: Search for Windows Defender Firewall
Press the Windows key and type:
Windows Defender Firewall
Open Windows Defender Firewall from the search results.
You can also access it through the Windows 11 Control Panel.
Step 2: Open Advanced Firewall Settings
Once the Windows Defender Firewall window appears, look at the left side of the window.
Click:
Advanced settings
Windows will open Windows Defender Firewall with Advanced Security.
This section provides more detailed controls for managing inbound and outbound network connections.
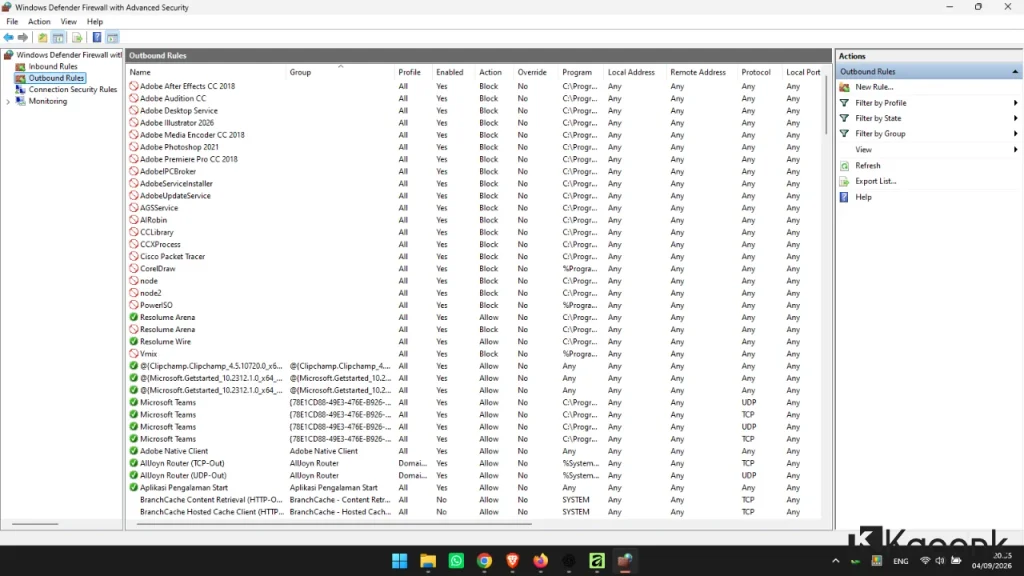
Step 3: Select Outbound Rules
In the left-hand menu, click:
Outbound Rules
You will see a list of existing firewall rules configured on your computer.
From the right-hand Actions panel, select:
New Rule…
This will launch the New Outbound Rule Wizard.
Step 4: Choose the Program Option
The wizard will ask what type of rule you want to create.
Select:
Program
Then click Next.
Choose:
This program path
Click Browse… and locate the executable file (.exe) belonging to the application you want to restrict.
For example:
C:\Program Files\Google\Chrome\Application\chrome.exe
After selecting the correct executable, click Next.
Tip: Make sure you select the actual
.exefile used by the application. Some programs have several executable files, so blocking the wrong file may not completely prevent the application from accessing the internet.
Step 5: Choose “Block the Connection”
The next screen determines what Windows should do when the application attempts to establish a connection.
Select:
Block the connection
Click Next to continue.
Step 6: Apply the Rule to Network Profiles
Windows 11 allows firewall rules to be applied to different network profiles.
You will see the following options:
- Domain
- Private
- Public
If you want the program to remain blocked regardless of which network profile is currently active, select all three options.
Click Next.
Step 7: Give the Rule a Name
Enter a descriptive name for the new firewall rule.
For example:
Block Internet Access – Chrome
You can use any name that makes the rule easy to recognize later.
Click Finish.
Windows will immediately add the new rule to the Outbound Rules list.


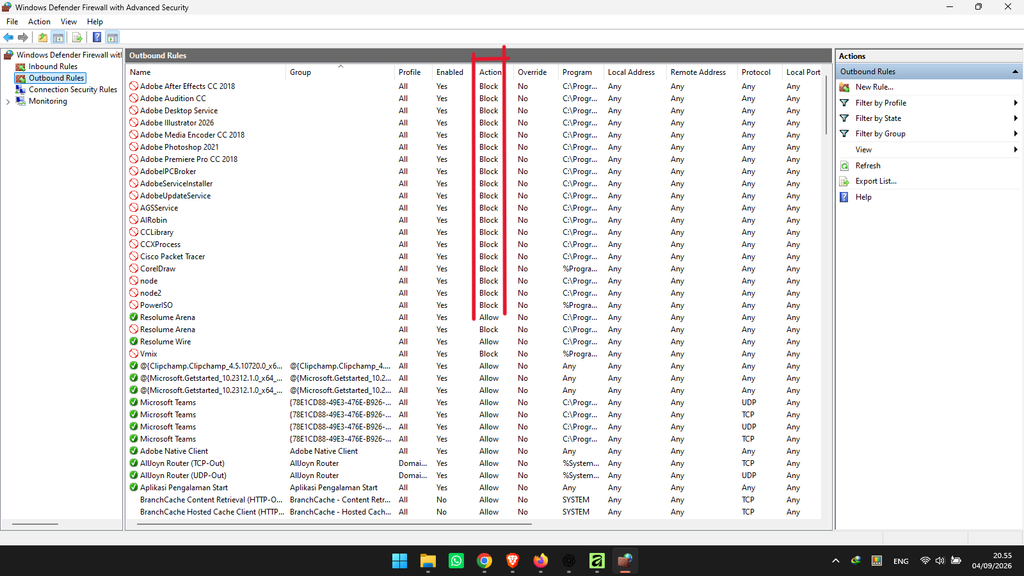
Check Whether the Application Has Been Blocked
After creating the firewall rule, it is a good idea to verify that it is enabled.
Go back to:
Windows Defender Firewall with Advanced Security → Outbound Rules
Locate the rule you just created.
Check that:
- The rule is Enabled
- The action is Block
- The program path points to the correct
.exefile
You can then launch the application and test its internet-dependent features.
If the rule is configured correctly, the application should no longer be able to establish the outbound connection covered by the rule.
What If the Program Can Still Access the Internet?
In some cases, blocking a single executable may not be enough.
Certain applications use multiple processes or executable files for their online functions. A program may also use a separate updater, launcher, helper service, or background process.
If the application continues to connect to the internet, check which executable is actually responsible for the network connection and create an additional outbound rule if necessary.
Be careful when doing this because blocking essential components may prevent the application from working properly.
How to Allow Internet Access Again
If you later decide to restore the application’s internet access, you do not need to recreate the firewall configuration.
Open:
Windows Defender Firewall with Advanced Security → Outbound Rules
Find the rule you created and right-click it.
You have two useful options:
Disable Rule
Choose Disable Rule if you want to temporarily allow the application to connect to the internet.
The rule remains available and can be enabled again whenever necessary.
Delete
Choose Delete if you no longer need the firewall rule.
This removes the rule from Windows Firewall permanently.
For temporary testing, disabling the rule is generally more convenient than deleting it.
Important Things to Keep in Mind
Although creating an outbound firewall rule is relatively safe when done correctly, you should still be careful about which applications you block.
Do Not Randomly Block Windows Components
Some Windows processes require network access to provide essential features. Blocking an important system component could result in unexpected errors or prevent certain Windows features from working correctly.
Keep Track of Your Firewall Rules
If you create many rules, use clear and descriptive names. This makes it much easier to identify them later.
For example:
- Block Chrome Internet
- Block Adobe Updater
- Block Game Launcher
- Block Application XYZ
Blocking Internet Access Is Not the Same as Uninstalling
A firewall rule does not remove or disable the application itself. It simply controls the network connections covered by that rule.
The program can still be opened and used for offline functions, provided it does not require an internet connection.
Can Windows 11 Firewall Block Specific Programs?
Yes. Windows 11 Firewall can be configured to restrict network communication for individual applications.
The most common approach is to create an Outbound Rule and select the application’s .exe file as the target.
This gives you much more control than simply turning the firewall on or off for the entire computer.
Do You Need Third-Party Firewall Software?
For basic application blocking, you generally do not need another firewall program.
The built-in Microsoft Defender Firewall already provides the necessary functionality to create inbound and outbound rules.
Third-party firewall applications may offer additional monitoring or a more user-friendly interface, but Windows 11’s built-in firewall is sufficient for many everyday use cases.
Conclusion
Learning how to block a program with Firewall in Windows 11 can be useful when you need greater control over the applications that are allowed to access the internet.
By creating an Outbound Rule through Windows Defender Firewall with Advanced Security, you can restrict a specific application without installing additional software.
The basic process is:
Windows Defender Firewall → Advanced settings → Outbound Rules → New Rule → Program → Block the connection
Remember to select the correct .exe file and apply the rule to the appropriate network profiles. If you no longer need the restriction, you can easily disable or delete the firewall rule.
With these built-in Windows 11 tools, you can manage application network access more effectively while keeping your system configuration under control.
